
Enabling HTTPS on JFrog Artifactory


Container Registry needs to be HTTPS accessible. This article explains an easy way to enable HTTPS on JFrog Artifactory
Background
We assume that you have completed JFrog Artifactor installation by following this story https://ghost.cyder.com.sg/installing-jfrog-container-registry-on-ubuntu/
Right now we are going to install NGINX, configure it as JFrog Artifactory reverse proxy, and enable Let’s Encrypt SSL on that NGINX.
Installing NGINX
Well, let’s start with installing NGINX. It is very easy, you just need to execute the following commands:
sudo apt update
sudo apt install nginx
After installation, allow HTTPS inbound connection
sudo ufw allow 'Nginx HTTP'Lastly, check the status of the NGINX
systemctl status nginxYou can then check the status of the NGINX, by hitting
http://your_server_ip
Configuring as Reverse Proxy
Now, we are going to configure NGINX as JFrog Artifactory Reverse proxy.
Go to this path /etc/nginx/sites-available and create new file. In my case, it is jfrog.cyder.com.sg file. This is the content of that file
server {
listen 80 default_server;
listen [::]:80 default_server;
server_name jfrog.cyder.com.sg;
if ($http_x_forwarded_proto = '') {
set $http_x_forwarded_proto  $scheme;
}
## Application specific logs
## access_log /var/log/nginx/artifactory.jfrog.com-access.log timing;
## error_log /var/log/nginx/artifactory.jfrog.com-error.log;
rewrite ^/$ /artifactory/webapp/ redirect;
rewrite ^/artifactory/?(/webapp)?$ /artifactory/webapp/ redirect;
chunked_transfer_encoding on;
client_max_body_size 0;
location / {
proxy_read_timeout  900;
proxy_pass_header   Server;
proxy_cookie_path   ~*^/.* /;
if ( $request_uri ~ ^/artifactory/(.*)$ ) {
proxy_pass          http://localhost:8081/artifactory/$1;
}
proxy_pass http://localhost:8081/artifactory/;
proxy_set_header X-Artifactory-Override-Base-Url $http_x_forwarded_proto://localhost:8081/artifactory;
proxy_set_header X-Forwarded-Port $server_port;
proxy_set_header X-Forwarded-Proto $http_x_forwarded_proto;
proxy_set_header Host $http_host;
proxy_set_header X-Forwarded-For $proxy_add_x_forwarded_for;
}
}
Go to this path /etc/nginx/sites-enabled and create soft link, using the following command
sudo ln -s /etc/nginx/sites-available/jfrog.cyder.com.sg jfrog.cyder.com.sgNow restart the NGINX server
sudo servicectl restart nginxTry accessing the JFrog Artifactory using http://jfrog.cyder.com.sg.
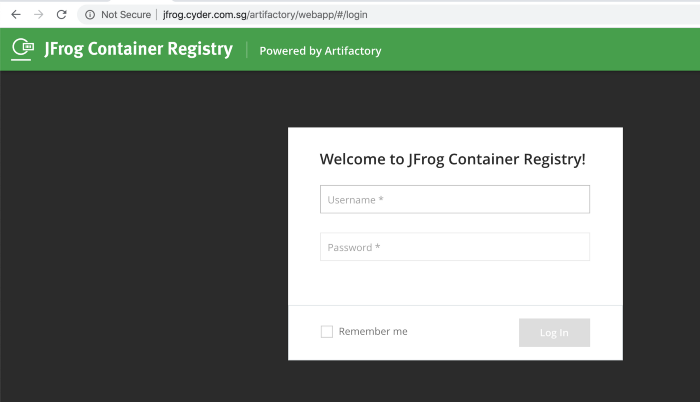
Enabling SSL
If you see the above screenshot, the URL is not secured, as it runs on port 80. Let’s enable SSL on NGINX, powered by Let’s Encrypt
Run these commands
sudo add-apt-repository ppa:certbot/certbot
sudo apt install python-certbot-nginx
sudo certbot --nginx -d jfrog.cyder.com.sg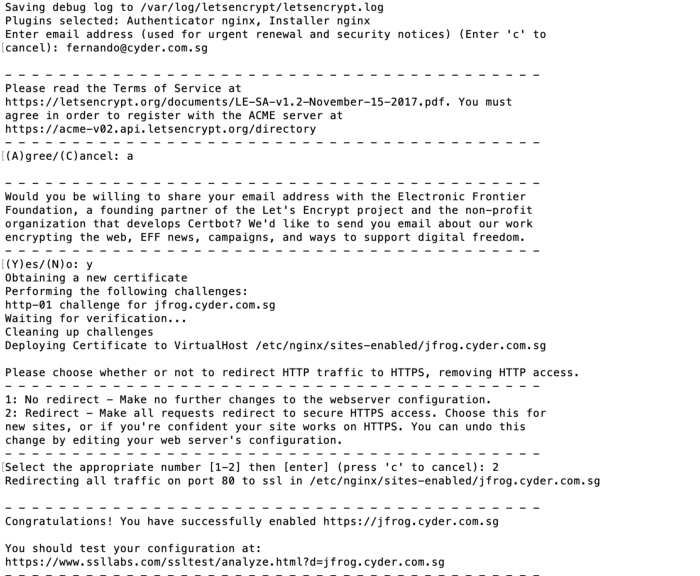
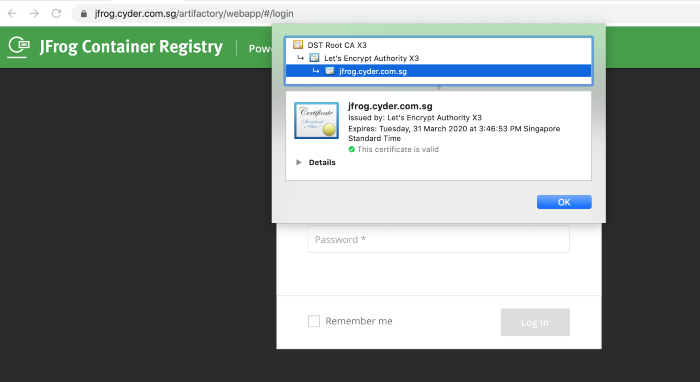
Try again accessing http://jfrog.cyder.com.sg/, now you will be redirected to HTTPS and check the SSL cert is issued by Let’s Encrypt.
Found this article useful? Let us know your feedback!